I've been spending a few weekends working on a DSL for writing zero-knowledge programs. It's been a fun project that's taught me a LOT about programming languages and their designs. I've always thought that it'd be boring to write a programming language, but my years of frustrations with languages X and Y, and my love for features Z and T of L, have made me really appreciate tweaking my own little language to my preferences. I can do whatever I want!
It's called "noname" because I really didn't know what name to give it, and I still haven't found a good one. You can play with it here: https://github.com/mimoo/noname, it is still quite bare bone but I'm amazed at what it can already do :D
It is very close to Rust, with some ideas from Golang that I liked. For example, I do not implement too much inference because it decreases readability, I force the user to qualify each library calls, I forbid shadowing within a function, etc.
Programs look like this:
use std::crypto;

fn main(pub public_input: Field, private_input: [Field; 2]) {
    let x = private_input[0] + private_input[1];
    assert_eq(x, 2);

    let digest = crypto::poseidon(private_input);
    assert_eq(digest[0], public_input);
}
and you can use the CLI to write your own programs, and generate proofs (and verify them). Underneath the kimchi proof system is used.
But the really cool feature is how transparent it is for developers! If you run the following command with the --debug option for example:
$ cargo run -- --path data/for_loop.no --private-inputs '{"private_input": ["2", "3", "4"]}' --public-inputs '{"public_input": ["9"]}' --debug
you will get a nice output teaching you about the layout of the compiled circuits:

as well as how the wiring is done:
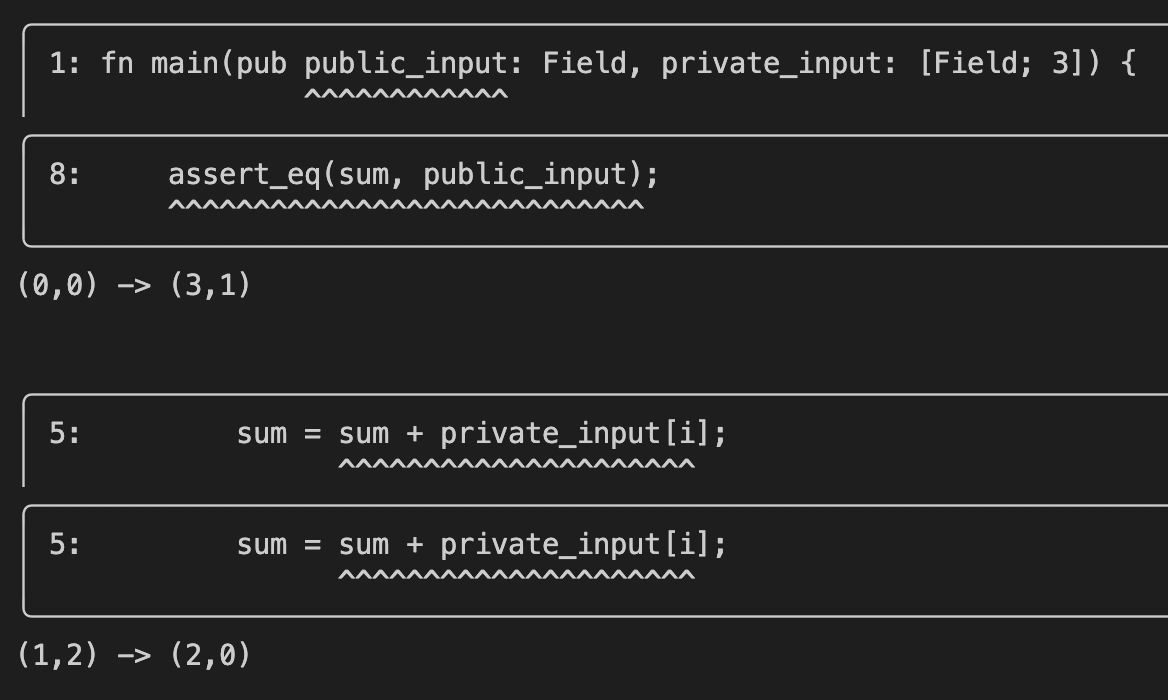
I spent some time explaining on my twitter how to read this output: https://twitter.com/cryptodavidw/status/1566014420907462656
I think there's a lot of educational benefit from this approach. Perhaps I should make a video going over a few circuits :)
It's been forever since I've been thinking of doing a podcast. Today I decided screw it, I'll do it live.
From the description:
This series focuses on teaching you about cryptocurrencies from the very start! We'll start with databases, banks, distributed systems, and we will then go further with Bitcoin, Ethereum, Mina, and other cryptocurrencies that are making the world advance today.
Listen to it here or on your favorite platform:
Or just listen to it here:
Cryptocurrencies from scratch: databases, the banking world, and distributed systems
This is the first episode of a series on cryptocurrencies. In this series I will tell you about cryptocurrencies from scratch. This first episode is quite non-technical and should be easy to understand for most folks. I will explain what databases are, how banks around the world move money around, and what cryptocurrencies fundamentally offer.
Bitcoin from scratch: The Bitcoin client, public keys and signatures, and the miners
In the previous episode we briefly talked about what cryptocurrencies fundamentally are, and what problems they attempt to solve. In this episode we'll dig int our very first cryptocurrency: Bitcoin. This will be a high-level overview that will cover what the software looks like, what cryptographic signatures are, and who are these miners who process transactions.
More on Bitcoin: How does mining work? What are hash functions? And what is Proof of Work?
In this third episode we'll dig more into the tech of Bitcoin. But for that, we'll need to talk briefly about cryptographic hash functions and how they work. Once done, we'll talk about mining, proof of work, chains of blocks, and mining pools!
This Monday I was at the Crypto Finance Forum 2022 in Paris. It was my first time going to a crypto conference that revolves around traditional finance and regulations (aka the current banking system). It was a really interesting experience, and here's a list of things I thought were interesting (to me) during the event. Note that it was hard to aggregate things as panels were often going in all sorts of directions:
Dress code. Am I going to be the only one in shorts and flip flops? Is everyone going to be wearing suits? Thanks no! There were a number of underdressed people, in addition to the suits of course.
Government-approved. A minister showed up. That’s the closest I ever got to the French government :D
Open banking. Some talks about how open banking laws in Europe created a boom of innovation and a fintech sector, and similarities with cryptocurrencies. (me: Indeed, cryptocurrencies seem to allow services to directly interact with the financial backbone and for users to share data across services more easily). Employees of banks at the time were leaving for fintech companies, now we're seeing a shift: they're leaving for crypto companies.
Open Banking emerged from the EU PSD2 regulation, whose original intent was to introduce increased competition and innovation into the financial services sector. PSD2 forces banks to offer dedicated APIs for securely sharing their customers' financial data for account aggregation and payment initiation. bankinghub.eu
AML. A panelist mentioned that cryptocurrencies have better tooling for AML (anti money laundering) and customer protection. (me: I guess currently banks will do their best to collect data and perhaps report to government agencies if they think they should. Not ideal compared to cryptocurrencies like Bitcoin, but that's ignoring privacy coins like Zcash.)
MICA. Throughout the conference, MICA kept being mentioned. It's a European regulation to "protect investors and preserve financial stability by creating a regulatory framework for the cryptoassets market that allows for continued innovation and maintains the attractiveness of the crypto currencies sector which is evolving quickly". It apparently was proposed at a time where NFTs were not really that big, so it is explicitly excluding NFTs from its scope. It applies to the 27 states of the EU which is quite practical as service providers won't have to comply to many laws to serve in many jurisdictions (although some panelists said that MICA would still throttle crypto innovation in Europe). Of course, the UK seems to be going a different way. Interestingly, while some of the US regulations were mentioned, nothing was said about Asian regulations (but I guess the audience did not care about that).
Stable coins. A euro stablecoin was mentioned, with projects like EUROC from Circle. People deplored the fact that a US company was at the source of this new stablecoin, citing it as one more example of the issues with Europe slow adoption of yet another technology.
Traditional players. A panelist mentioned that some traditional players, like Paypal and Visa, were investing in their own stablecoin projects. Although banks are still in observation mode (me: talking to some bankers at the event, it seems like banks have tiny crypto teams that have been investigating the field for years, but nothing concrete has been approved. What is changing is that more and more clients are asking to invest into crypto, and so banks have to look into it.)
Not part of the discussion. Interestingly, the word "layer one" was never pronounced during the whole event. There was one panel that had a regulation specialist working at NEAR, but that's it. It seemed like cryptocurrencies were seen as blackboxes that regulations could not touch; only service providers can be regulated. It seems really weird to me that there's no talk of having cryptocurrencies meet in the middle with regulations, as there's a lot that a cryptocurrency can do at the protocol layer (perhaps because no regulations exist for currencies? As one of the panelist mentioned).
For example, if you try to off-ramp, and convert some crypto into fiat at your favorite exchange (called a CASP in MICA, and a VASP in FATF, of course they had to choose a different name), they will surely ask you where the funds came from. You might have got the crypto by selling a ticket for an event (apparently a lot of the tickets for EthCC were paid in USDC), and that sounds good enough, but what about the buyer? Who says that they didn't get their tokens selling weapons or something?
In the current banking system, it is assumed that every transaction goes through a bank and so things are recorded eventually (with the exception of cash and other hard-to-move-lots-of-money ways). But in crypto, that's not true anymore. So it seems to me that regulators just don't understand this, or are OK with it (which seems weird to me, considering how much they seem to want to know).
The interesting thing is that you can probably think of schemes that work and are privacy-enhanced by using zero-knowledge proofs. For example, a layer one could force every transaction to provide a zero-knowledge proof that some approved entity has recorded the transaction and its metadata. (Perhaps a signature from that entity is enough though.)
(Smart contracts were rarely talked about as well.)
Reconciliation. One of the big topic of the event was reconciliation between the current/traditional financial world and crypto. This is of course a very interesting topic to me, as I worked on the diem (libra) project which was heavily betting on that (before it got shut down). In crypto conferences I go to, I mostly see updates about projects, but I seldom hear about banks or payment networks and how they could switch to using crypto. Interesting remark from a panelist: it will be on crypto actors to train and learn about the financial world and its regulations, and on the regulators to try to adapt to cryptocurrencies.
Environmental impact. There was a lot of confusion and misunderstanding about the environmental impact of cryptocurrencies. I felt like some of the panelists sounded like Bitcoin maximalists, repeating many of the false narratives you can hear from the Bitcoin community (proof-of-stake is less secure and decentralized than proof of work, proof of work is special because it directly converts energy into money, with proof of work there is a real cost to mine, proof of work actually needs to be compared to the consumption of the current financial system (greenwashing?), etc.)
(me: there are many problems with proof of work: it's a race to the top, you're constantly incentivized to use more energy; it's slow; it is less secure (51% attacks have happened regularly whereas proof of stake hasn't had any attacks as far as I know); it hinders interoperability between blockchains or light clients; etc.)
"Impact investing" was the word du jour. It seems to refer to investments "made into companies, organizations, and funds with the intention to generate a measurable, beneficial social or environmental impact alongside a financial return” (wikipedia).
Keywords. "metaverse", "web3", "NFTs", "gaming", "supply-chain". People seem to want to appear in-the-loop. Even the minister mentioned web3. It's interesting as I would have expected bankers and others to be more skeptical about some of these and focus more on the fast, secure, and interoperable settlement capabilities.
The need for regulation in Europe. Interestingly, it was mentioned several times that even though Europe has a lot of good engineers, regulations have already slowed down crypto adoption and innovation. Some panelists argued about how much exactly, of the world's total assets, are in crypto. It sounded like it was negligible, and that no issues in crypto could trigger a global crisis, and so it was not the right time to regulate. A panelist even said that it was "questionable" to do so, as nobody has any idea what they are trying to regulate today. We are lucky to witness the burst of a new ecosystem and like every new ecosystem the beginning is pure chaos. We need to make sure that we have the chance to experiment and fail.
One of the panelist said that Terra (the stablecoin) failing now was good news, as it would be worse if a stablecoin would have failed while being used at a massive scale in the world economy. (Although, building confidence takes years, and losing trust takes days.) Another panelist argued that Terra was centralized, and that is why it failed (me: that's not my understanding), and then mentioned tether resisting attacks (me: it seemed like people have confidence in tether, which is interesting). Panelists also mentioned DAI, saying that regulators had to understand these new types of algorithmic stablecoins (not backed by actual fiat money, but referencing the price of fiat). Someone argued that without liquid assets to back a stablecoin, you're facing a crisis.
Another interesting thing from an economist who didn't seem to like stablecoins or crypto in general, was that he liked crypto when used for ICOs. I'd really like to know why that specific use-case was interesting to him.
Some of the discussion focused on how all of the largest banks and payment networks in the world are American. "In Europe, we are always wondering what is the best way, in the US they're wondering if something works". (It seems like Europe is still debating if they need crypto or not.)
Stablecoins. The recent crashes around stablecoins have led to a lot of regulatory attention. The FSB (Financial stability board comprising many members) for example said this month:
Stablecoins should be captured by robust regulations and supervision of relevant authorities if they are to be adopted as a widely used means of payment or otherwise play an important role in the financial system. A stablecoin that enters the mainstream of the financial system and is widely used as a means of payments and/or store of value in multiple jurisdictions could pose significant risks to financial stability in the absence of adequate regulation. Such a stablecoin needs to be held to high regulatory and transparency standards, maintain at all times the reserves that preserve stability of value and meet relevant international standards. (https://www.fsb.org/2022/07/fsb-issues-statement-on-the-international-regulation-and-supervision-of-crypto-asset-activities/)
A panelist said that the ECB (European central bank) had failed its main goal: stability of prices, and that it should not be able to regulate currencies. There was then some question about legal tender, and if stablecoins could be considered legal tender at some point. Crypto was defined as a partial currency, not a full currency, because in most countries it is still not legal tender.
Legal tender is anything recognized by law as a means to settle a public or private debt or meet a financial obligation, including tax payments, contracts, and legal fines or damages. The national currency is legal tender in practically every country. A creditor is legally obligated to accept legal tender toward repayment of a debt. (...) Legal tender laws effectively prevent the use of anything other than the existing legal tender as money in the economy. (https://www.investopedia.com/terms/l/legal-tender.asp)
Central banks and regulators are in the same boat here, and they're going to resist stablecoins and crypto. The role of a central bank is to preserve financial stability (the FEDs were given as an example, as they were created right after a crisis). Blockchain as technology can be decoupled from blockchain as cryptocurrencies, and countries (central banks?) could adopt the technology.
There was some talks about Mica putting all stablecoins in the same basket, which was apparently annoying. Someone said that tokenizing a money market fund would make the best stablecoin (me: whats a money market fund?)
CBDCs. CBDCs are central bank digital coins. They are the governments and their central banks' answers to private currencies (libra was mentioned several times as something that could have been THE private currency, a currency not directly backed by a government).
It seems like Banque de France (France's central bank) was already working on a wholesale CBDC, but not for retail use (me: retail always refers to normal people using the digital coin directly, like with metamask).
It was mentioned that this week, Russia's central bank was launching a digital coin. China also is working on a CBDC (me: probably inspired by the prevalence of wechat taking over digital payment in China (you can't pay in cash anymore in China)). The upside, from China's perspective, is being able to track its citizens more and mix social score (their new way to tame their citizens) with money, and also having a way to make the yuan more present in the world's economy. The US, on the other hand, already has many stablecoins running on blockchains.
Panelists seemed worried that Europe could be left behind, once again. (Someone even mentioned Europe not having been bullish on the technology of the Internet fast enough.)
A lot of the discussion focused on how the USD was THE dominant currency in the world, probably because they were the first mover. 60% of central banks reserve is in USD (2% for the yuan). Apparently there's always tend to be a single dominant currency internationally. China is trying to be the first mover in the CBDC space, and perhaps will take advantage of that to get a bigger slice of the world currency pie.
There was also some concerns about how CBDCs might want to replace crypto with their own solutions, which might be bad for privacy and used as a surveillance tool.
The debate then focused on currencies as a definition (a mean of payment, a mean of exchange, a unit of account, a storage of value, ...). One of the panelist argued that euro was not a store of value anymore, and that the ECB had abandoned its mission to issue a storage of value object (and that people in general had stopped using currencies as storage of value).
Again, there was a lot of worries that the US was going to take too much of an advantage, and that Europe will end up using US services built on crypto (you can't talk to a pension fund in the US today that hasn't invested in crypto, apparently). Interesting phrasing from a panelist: "When you're thinking of investing on a thesis, you shouldn't wait for an antithesis to invest. If you wait for it to be a success then its too late to invest".
Finally, someone mentioned that nobody talked about the future of cash. But that was at the end of a panel.
I've been talking about zero-knowledge proofs (the "zk" part) for a while now, so I'm going to skip that and assume that you already know what "zk" is about.
The first thing we need to define is: what's a virtual machine (VM)? In brief, it's a program that can run other programs, usually implemented as a loop that executes a number of given instructions (the other program). Simplified, a VM could look like this:
let stack = Stack::new();
loop {
    let inst = get_next_instruction();
    apply_instruction(inst, stack);
}
The Ethereum VM is the VM that runs Ethereum smart contracts. The original list of instructions the EVM supports, and the behavior of these instructions, was specified in 2014 in the seminal yellow paper (that thing is literally yellow) by Gavin Wood. The paper seems to be continuously updated so it should be representative of the current instructions supported.
a zk VM, is simply a VM implemented as a circuit for a zero-knowledge proof (zkp) system. So, instead of proving the execution of a program, as one would normally do in zkp systems, you prove the execution of a VM. As such, some people say that non-VM zkps are part of the FPGA approach, while zkVMs are part of the CPU approach.
Since programs (or circuits) in zkp systems are fixed forever (like a binary compiled from some program really), our VM circuit actually implements a fixed number of iteration for the loop (you can think of that as unrolling the loop). In our previous example, it would look like this if we wanted to support programs of 3 instructions tops:
let stack = Stack::new();
let inst = get_next_instruction();
apply_instruction(inst, stack);
let inst = get_next_instruction();
apply_instruction(inst, stack);
let inst = get_next_instruction();
apply_instruction(inst, stack);
EDIT: Bobbin Threadbare pointed to me that with STARKs, as there is no preprocessing (like plonk), there's no strict limit on the number of iteration.
This is essentially what a zkVM is; a zk circuit that runs a VM. The actual program's instructions can be passed as public input to that circuit so that everyone can see what program is really being proven. (There are a number of other ways to pass the program's instructions to the VM if you're interested.)
There's a number of zkVMs out there, I know of at least three important projects:
- Cairo. This is used by Starknet and I highly recommend reading the paper which is a work of art! We also have an experimental implementation in kimchi we call turshi.
- Miden. This is a work-in-progress project from Polygon.
- Risczero. This is a work-in-progress project that aims at supporting the set of RISC-V instructions (a popular standard outside of the blockchain world).
All of them supports a different instruction set, so they are not compatible.
A zkEVM, on the other hand, aims at supporting the Ethereum VM. It seems like there is a lot of debate going on about the actual meaning of "supporting the EVM", as three zkEVM were announced this week:
So one can perhaps divide the field of zk VMs into two types:
- zk-optimized VMs. Think Cairo or Miden. These types of VMs tend to be much faster as they are designed specifically to make it easier for zkp systems to support them.
- real-world VMs. Think RiscZero supporting the RISC-V instruction set, or the different zkEVMs supporting the Ethereum VM.
And finally, why would anyone try to support the EVM? If I'd have to guess, I would come up with two reasons: if you're Ethereum it could allow you to create proofs of the entire state transition from genesis to the latest state of Ethereum (which is what Mina does), and if you're not Ethereum it allows your project to quickly copy/paste projects from the Ethereum ecosystem (e.g. uniswap) and steal developers from Ethereum.